Site - 让前端更优雅
为notebook app提供 site app支持
- 名词解释
site: 比base提供的更强大的前端, 目前用做ecstore的前端展示提供模板机制, 站点管理, 菜单管理, sitemap, seo优化, sitemap, url路由, 提示信息, 友情链接等. 是自由建站的利器!
- 在app目录下引入site软件包
[http://app.wanxiaohong.cn/svn/site/trunk]
- 修改: app/notebook/app.xml,使notebook依附于site。
        ...
	<depends>
		...
		<app>site</app>
	</depends>
	...
- 重新安装 notebook
bryant@forsky /Users/bryant/codes/notebook/app/base %> sudo ./cmd install -r notebook
Creating table sdb_image_image
Creating table sdb_image_image_attach
Installing service desktop_finder.image_mdl_image
image "en-us" language resource stored
image "zh-cn" language resource stored
Installing Cache_Expires DB:IMAGE_IMAGE
UPDATE CACHE EXPIRES KV DATA
Installing Cache_Expires DB:IMAGE_IMAGE_ATTACH
UPDATE CACHE EXPIRES KV DATA
Installing permission image
Installing panelgroup images
Installing adminpanel admin_manage:index
Installing adminpanel admin_manage:imageset
Initial image
Application image installed... ok.
Creating table sdb_site_explorers
Creating table sdb_site_link
Creating table sdb_site_menus
Creating table sdb_site_modules
Creating table sdb_site_route_statics
Creating table sdb_site_seo
Creating table sdb_site_themes
Creating table sdb_site_themes_tmpl
Creating table sdb_site_widgets
Creating table sdb_site_widgets_instance
Creating table sdb_site_widgets_proinstance
Installing service desktop_finder.site_mdl_explorers
Installing service desktop_finder.site_mdl_link
Installing service desktop_finder.site_mdl_modules
Installing service desktop_finder.site_mdl_seo
Installing service desktop_finder.site_mdl_menus
Installing service desktop_finder.site_mdl_themes
Installing service desktop_finder.site_mdl_route_statics
Installing service desktop_finder.site_mdl_route_statics
Installing service desktop_finder.site_mdl_widgets_proinstance
Installing service desktop_finder_callback.site_mdl_modules
Installing service desktop_finder_callback.site_mdl_modules
Installing service app_content_detector
Installing service view_compile_helper
Installing service view_helper
Installing service site_view_helper
Installing service site_controller_content
Installing service cachemgr_global_vary
Installing service site_service_seo
Installing service autotask
Installing service desktop_menu
Installing service site_maps
Installing service dev.project_type
Installing service site_theme_content_detector
Installing service tpl_source.site_proinstance
Installing service site_display_errorpage.conf
site "en-us" language resource stored
site "zh-cn" language resource stored
Installing Cache_Expires DB:SITE_EXPLORERS
UPDATE CACHE EXPIRES KV DATA
Installing Cache_Expires DB:SITE_LINK
UPDATE CACHE EXPIRES KV DATA
Installing Cache_Expires DB:SITE_MENUS
UPDATE CACHE EXPIRES KV DATA
Installing Cache_Expires DB:SITE_MODULES
UPDATE CACHE EXPIRES KV DATA
Installing Cache_Expires DB:SITE_ROUTE_STATICS
UPDATE CACHE EXPIRES KV DATA
Installing Cache_Expires DB:SITE_SEO
UPDATE CACHE EXPIRES KV DATA
Installing Cache_Expires DB:SITE_THEMES
UPDATE CACHE EXPIRES KV DATA
Installing Cache_Expires DB:SITE_THEMES_TMPL
UPDATE CACHE EXPIRES KV DATA
Installing Cache_Expires DB:SITE_WIDGETS
UPDATE CACHE EXPIRES KV DATA
Installing Cache_Expires DB:SITE_WIDGETS_INSTANCE
UPDATE CACHE EXPIRES KV DATA
Installing Cache_Expires DB:SITE_WIDGETS_PROINSTANCE
UPDATE CACHE EXPIRES KV DATA
Installing menu site_ctl_admin_module
Installing menu site_ctl_admin_module
Installing menu site_ctl_admin_module
Installing menu site_ctl_admin_module
Installing menu site_ctl_admin_module
Installing menu site_ctl_admin_module
Installing menu site_ctl_admin_module
Installing menu site_ctl_admin_module
Installing menu site_ctl_admin_module
Installing menu site_ctl_admin_module
Installing menu site_ctl_admin_module
Installing menu site_ctl_admin_module
Installing workground site.wrokground.theme
Installing workground site.wrokground.theme
Installing permission site
Initial themes
Application site installed... ok.
Creating table sdb_notebook_item
Installing service notebook_addon
Installing service desktop_finder.notebook_mdl_item
Installing Cache_Expires DB:NOTEBOOK_ITEM
UPDATE CACHE EXPIRES KV DATA
Installing menu notebook_ctl_admin_notebook
Installing workground notebook_admin_notebook
Installing permission notebook_manage
Application notebook installed... ok.
- 进入后台,效果如下:

- 现在我们已经可以看到模板很多的功能了。
下边开始准备为我们自己的模板提供在线安装
创建自己的个性化模板
- 目前我们的site app的在线模板中只支持ecstore的模板, 因此我们要根据项目设计自己的模板
模板设计文档参见:[/ecos/quickstart/advance/site/template.html]
- 为了方便演示,我们下载一个现有的模板, 进行修改:
- 进入站点->模板列表->在线安装模板

- 我们选择在线安装电子数码模板
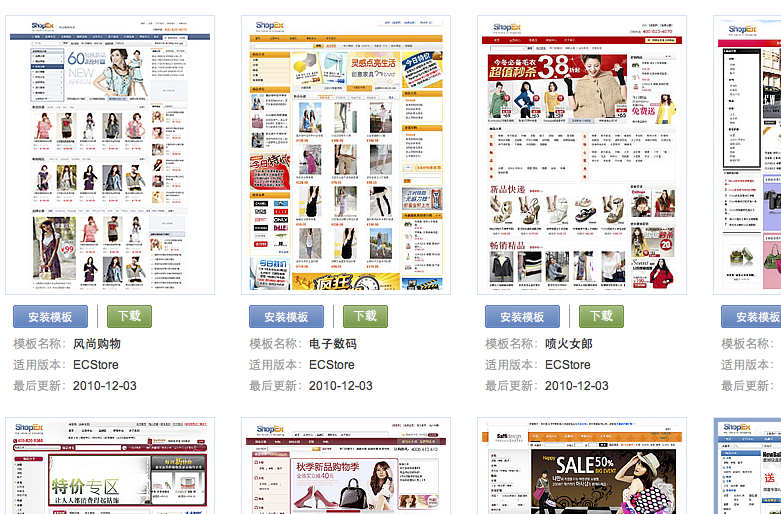
- 模板被安装到 [项目名称]/themes/digital 目录下
- 创建我们自己的模板目录 [项目名称](以后略去)/themes/notebook
- 从themes/digital目录下拷贝必要的文件到我们自己的模板目录下 themes/notebook
block
borders
default.html
images
index.html
preview.jpg
theme.xml
注:以上文件缺一不可,一定得复制完全!
- 创建:themes/notebook/info.xml
<?xml version="1.0" encoding="UTF-8" ?>
<theme>
  <name>notebook</name>
  <id>notebook</id>
  <version>0.1</version>
  <info></info>
  <author>ShopEx-bryant</author>
  <site>https://blog.wanxiaohong.cn</site>
  <update_url></update_url>
  <borders>
    <set key="邮件订阅" tpl="borders/border1.html" />
    <set key="边栏样式" tpl="borders/border2.html" />
    <set key="品牌热卖排行" tpl="borders/border4.html" />
    <set key="热销排行" tpl="borders/border5.html" />
    <set key="首页商品列表" tpl="borders/border6.html" />
    <set key="页尾文章列表" tpl="borders/border9.html" />
    <set key="购买本商品的顾客还买过" tpl="borders/border10.html" />
  </borders>
  <views></views>
  <config></config>
</theme>
因为我们复制的theme.xml这个文件里有很多无用的widget,所以我们还要做下面操作 - 打开theme.xml然后将该文件的内容全部替换成刚才新建的info.xml里的内容(两个文件的内容一模一样便可)。我们的模板已初步完成
- 删除我们的参照模板目录 themes/digital
- 为了让系统重新加载模板, 我们需要重新安装site
bryant@forsky /Users/bryant/codes/notebook/app/base %> sudo ./cmd uninstall -r site
...
...
bryant@forsky /Users/bryant/codes/notebook/app/base %> sudo ./cmd install notebook
...
...
- 进入后台, 看看我们自己的模板
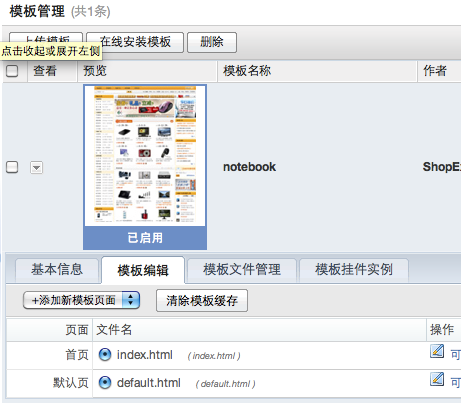
- 点击上图中的可视化编辑,效果下图所示:

创建前台导航widget
- 如果已经看过我们的模板设计文档, 应该已经对widget有个基本概念
- 实际上系统添加 widget 有两种方式:
- 通过app进行添加 app/[$app_name]/widgets 目录下
- 通过模板进行添加 themes/[$theme_name]/widgets 目录下
- 我们选择通过app进行添加,具体实现过程如下:
- 创建app/notebook下的widgets目录 app/notebook/widgets
- 把 app/b2c/widgets/menu_lv1 目录拷贝到 app/notebook/widgets,通过拷贝的方式建立前台导航widgets。
- 修改挂件描述文件: app/notebook/widgets/menu_lv1/widgets.php,把文件中的 app::get('b2c')->_('xxxx') 的写法换成 'xxxx'。
- 前后对比效果图如下:
修改前:
$setting['name']=app::get('b2c')->_('商店导航菜单');修改后效果:$setting['name']='商店导航菜单';
这种奇怪的写法是为了多语言的考虑, 暂无需理解。 - 大功告成, 重新安装 site app
bryant@forsky /Users/bryant/codes/notebook/app/base %> sudo ./cmd uninstall -r site
...
...
bryant@forsky /Users/bryant/codes/notebook/app/base %> sudo ./cmd install notebook
...
...
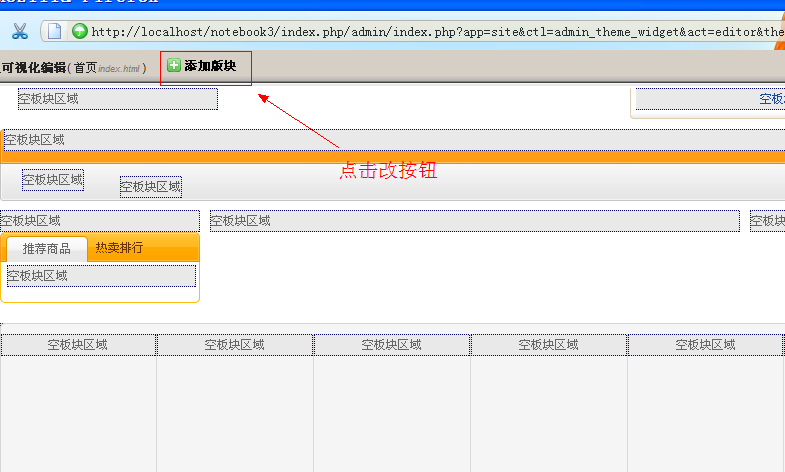
- 进入 index.html 可视化编辑页, 添加刚刚写完的widgets,具体操作流程如下:
- 点击页面左上角添加模板按钮,如下图所示:
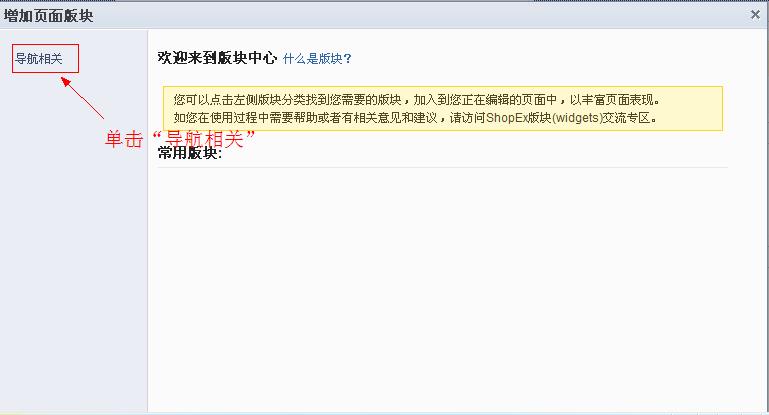
- 在弹出的增加页面板块提示框中,单击左侧列表的导航相关,如下图所示:
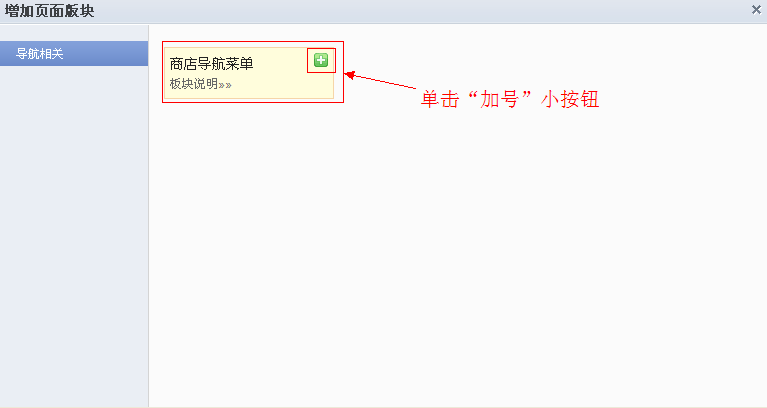
- 在右侧弹出商店导航菜单中,单击商店导航菜单右上角的小加号,如下图所示:
- 将数据移动到页面的导航菜单栏的左上角,会自动弹出蓝色的小编辑条,单击蓝色编辑条右侧的编辑按钮,如下图所示:

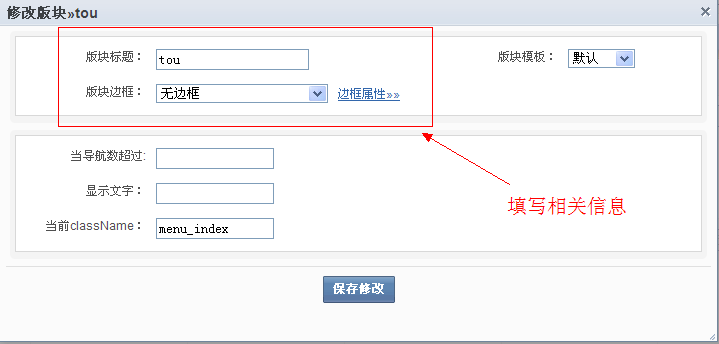
- 在出现的修改板块提示框中,填写板块标题,选择板块边框为无边框,单击保存修改按钮,如下图所示:
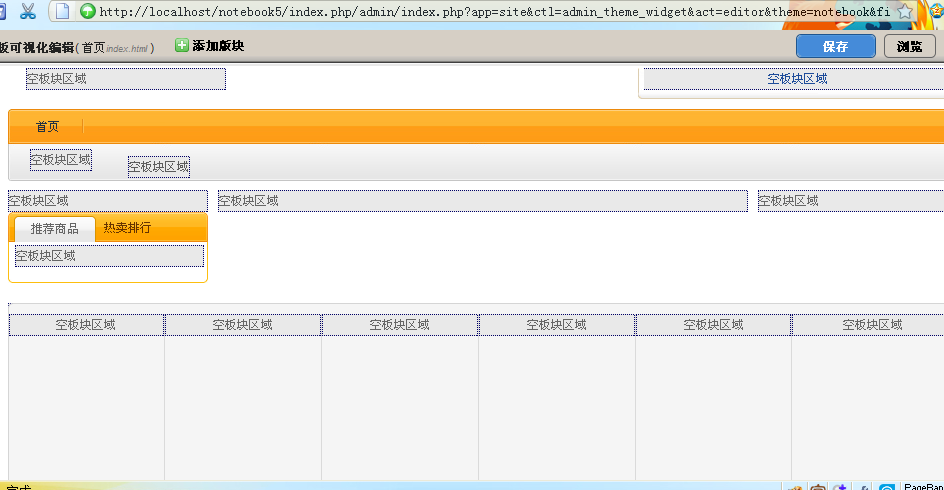
- 最后单击可视化编辑页面右上角的保存按钮,待保存完毕,关闭可视化编辑页面。如下图所示:
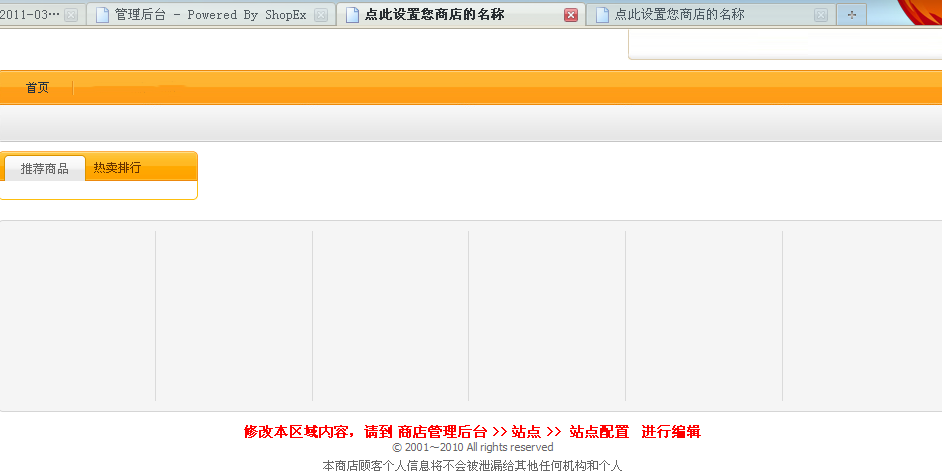
- 这时我们可以点击模板下方的启用此模板,启用我们自建的模板。然后我们可以访问[http://lcoalhost/项目名称/index.php]查看效果,如下图所示:
让我们的前端支持site
下面,我们开始对之前的notebook前端进行改造:
- 为notebook增加:app/notebook/site.xml
<site>
    <explorer id='notebook' path='view/site'>notebook</explorer>

    <module controller='site_default' >
        <name>default</name>
        <title>notebook</title>
        <disable>false</disable>
        <allow_menu act='index'>留言板</allow_menu>
        <default_menu>
            <title>留言板</title>
            <act>index</act>
            <hidden>false</hidden>
        </default_menu>
    </module>
</site>
- 修改mapper文件 config/mapper.php
将
'/' 设置为 array('app' => 'site')
我们让site app来接管 通过url对控制器的调度方式
- 更改老的控制器位置将 app/notebook/controller/default.php 搬到 app/notebook/controller/site/ 目录下
- 修改 default.php
- 更改控制器的名称为notebook_ctl_site_default, 并将继承类从 base_controller 改为 site_controller
注:[http://localhost/项目名称/index.php/default.html] 对应到控制器为 **notebook_ctl_site_default**
这样的目的是为了seo友好
将function index 里的
$this->display('default.html');替换为$this->page('default.html');
将function addnew 的
$this->begin(array("ctl" => "default", "act" => "index", "app"=> "notebook"));
替换为 $this->begin(array("ctl" => "site_default", "act" => "index", "app"=> "notebook"));
- 修改页面文件app/notebook/view/default.html,修改form表单"提交"的控制器,修改代码如下:
将
...
<form id="writer" method="post" action="<{link ctl='default' act='addnew' app='notebook'}>">
...
修改为:...
<form id="writer" method="post" action="<{link ctl='site_default' act='addnew' app='notebook'}>">
...
- 卸载site, 重新安装notebook
- 输入[http://localhost/项目名称/index.php/default.html],效果如下:

- 现在页面显得稍微有点凌乱,我们可以尝试修改视图文件:app/notebook/view/default.html,将html 的头和尾去掉。最终效果如下:

访问出错后解决方案
- 如果没有出现预期的结果或者是出现警告信息,可以尝试下载一个新模板然后切换模板。操作步骤如下:
- 点击在线安装模板按钮,在弹出模板列表页中选择并安装一个新的模块。如下图所示:

- 点击刚下载的新模板的启用此模板。如下图所示:
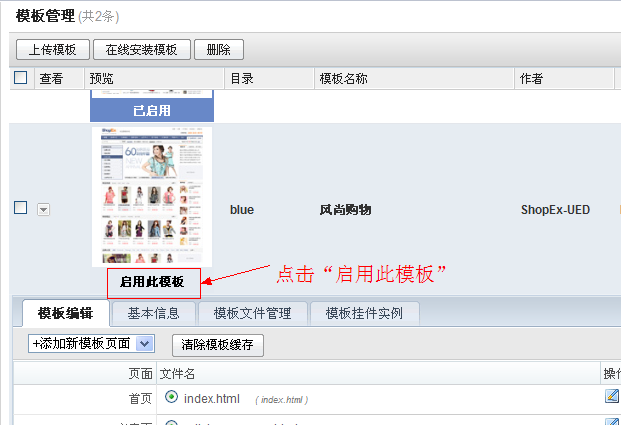
- 最后再点击我们之前的模板notebook中的启用此模板,启用我们自建的模板。然后再访问[http://localhost/项目名称/index.php/default.html]。